
The Making of Hex-An
On 25 February, Pebble (the company) announced the Pebble Time smartwatch on Kickstarter. This showed a refined aesthetic design, along with a 64-colour screen, which sparked a surge of creativity for me to design some awesome-looking watchfaces. Naturally, I couldn't resist implementing one of them, so here's the 'behind-the-scenes' account of my first production for the Pebble platform.
Graphics and Design
Having taken Graphics & Design through college (secondary school here in NZ), the first step in the design process was to generate several initial ideas, before refining the front-runners further. Below is just one page of these ideas, where several aspects and fragments of designs were explored.

Some of the initial ideas for a Pebble Time watchface. Those pencils from Webstock 2015 came in handy!
Getting these ideas on paper helped uncover practical considerations when assembling the whole solution, when the inspiration deals with only a few aspects at a time. Some of the questions to resolve were as follows:
- How can 12 hours be arranged? 24 hours?
- Which arrangements work best for readability when considering each hour from 0-11 or 0-23?
- How can 60 minutes be represented and arranged effectively, given the existing 12 or 24 hour representation?
- How can 60 seconds be represented and arranged effectively, given the existing hour and minute representations?
- How can the hours, minutes and seconds be displayed to effectively convey the hierarchy of the time components?
- What proportions work best for each element?
- How can this be clearly presented in a 144x168 pixel display?
Some of these questions became more relevant when refining these on the computer. Here, it was much easier to change colours and adjust elements. For this, I used Inkscape, an open-source vector drawing package. What I really like about this is the ease of constructing geometric forms with accurate mathematical precision. Line segments can be easily snapped to 15° intervals, nodes can be snapped to line intersections, cusp nodes, midpoints, other paths (when extruding at a fixed angle), etc.
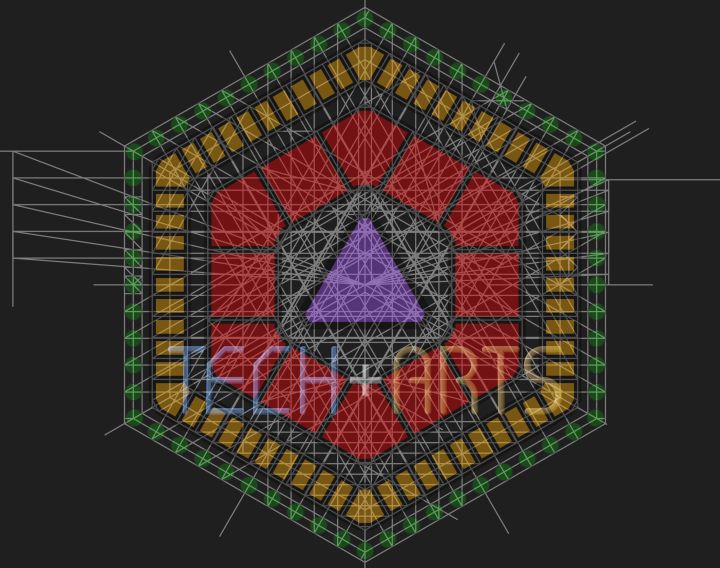
The Hex-An watchface showing all 3 layers of construction lines.
One thing I found really helpful, was to create the construction paths for hours, minutes and seconds in separate layers so that I could toggle visibility. This made snapping easy, so that irrelevant construction didn't hijack where subsequent nodes were to be placed. Finally, all construction lines were hidden prior to exporting the image to PNG (bitmap) format.
Once in bitmap form, scaled to the Pebble's display resolution, the next task was to tidy up the anti-aliased rendering for symmetry and cleanliness at a reduced (6-bit) colour space. This turned out to be a painstaking task, especially for the seconds, as many of these segments didn't line up with the pixel grid easily. Part of this was due to the angles of 30° / 60° not coinciding exactly with a 2:1 gradient. Also, small circles were found to be tricky to represent at low resolutions, without looking irregular and too much like squares or diamonds. Another consideration was maintaining regular spacing, so that some segments don't seem to clump together or stray away from the line. My wish is to be able to parametrically adjust scale, spacing, etc. for greater pixel alignment at the vector modelling stage, so that I can avoid much of this pixel-tweaking in future.
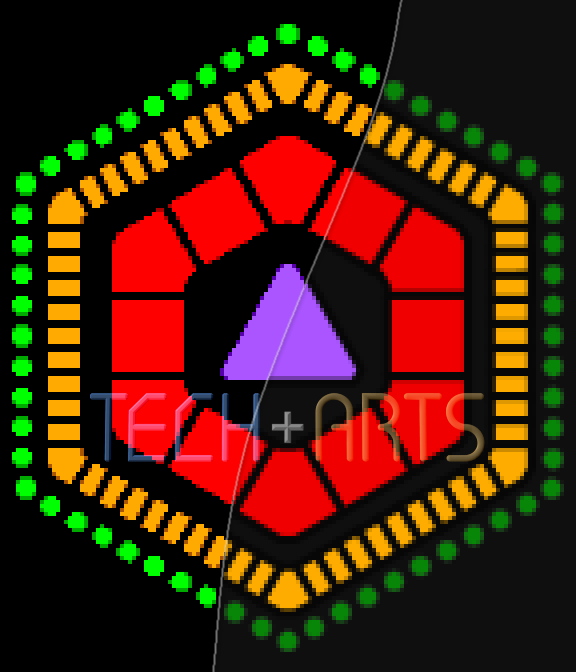
Left: The tidied watchface, reduced to 6-bit colour; Right: The original anti-aliased output from Inscape. (Shown at 4x)
The Aplite platform provided an extra dimension to this challenge, since the binary colour space doesn't allow for anti-aliasing. To maintain readability, the dark 'future' segments were reduced to small-scale outlines or dots/lines; brighter 'past' segments were reduced to outlines at the same scale, leaving only the 'current' segment as a full block of white.
After finalising the layout, I copied each distinct segment to a separate spritesheet and recorded the original position and spritesheet cell position. This was so that the C code could assemble the individual segments into the proper arrangement. It was at this stage that the Aplite spritesheet was edited to reduce the relevant segments to outlines.
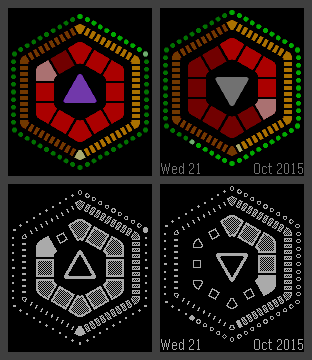
Top: The spritesheet for the colour watchface (Pebble Time); Bottom: The monochrome spritesheet for the original Pebble.
Development in Code
Pebble's developer documentation proved to be very useful in getting started with a basic text-only watchface, and providing guidance for incrementally turning that into the final Hex-An watchface with animations and configuration. This was written in C, which meant that the responsibility for explicitly deallocating data structures was with me, rather than a garbage collector (like in .NET or Java). This is actually a good thing as it gave me greater control over managing 'object' scope.
Defining and Rendering Sprites
Creating the first working version, without animations, actually took less time than generating the graphical assets. However, this was not trivial - due to the task of entering the mappings for each segment, from the original sprite & its position in the spritesheet to the final watchface. There were a few efficiency gains from being able to reuse the same sprite for multiple segments, though it was important to preserve the anti-aliasing pattern as much as possible so that the segments didn't look slightly misaligned.
Notes of the mappings for each segment to its location on the spritesheet, and final position on the watchface.
The rendering of sprites required loading the spritesheet in from a PNG resource and performing calls to graphics_draw_bitmap_in_rect(). The beauty is that the same block of memory containing the image data was reused for every 'child' GBitmap created; each single sprite within the spritesheet required its own GBitmap created via calling gbitmap_create_as_sub_bitmap(). This means that two sets of mappings were actually defined - the first being the individual sprite bitmaps from their size and position in the spritesheet. This was able to be optimised since the spritesheets were arranged for logical consistency, so that for loops could be used to load each row of sprites.
The other type of mapping was a tuple for each segment, to the (indexed) sprite to use and the co-ordinates on the watchface. In C code, this looks like the following:
static const SpriteSet SEGMENT_MAPPINGS =
{
	133,
	(BSpriteInst[])
	{
		{ 0,	54, 66},	// AM/PM

		{ 2,	59, 33},	// Hour: 12 or 00
		{ 3,	77, 42},
		{ 4,	95, 52},
		{ 5,	98, 75},	// Hour: 3
		{ 6,	95, 95},
		{ 7,	77,102},
		{ 8,	59,111},	// Hour: 6
		{ 9,	42,102},
		{ 10,	28, 95},
		{ 5,	28, 75},	// Hour: 9
		{ 11,	28, 52},
		{ 12,	42, 42},

		{ 35,	66, 16},	// Min: 60 or 00
		{ 42,	76, 20},
		{ 43,	81, 23},
		{ 44,	86, 26},
		{ 45,	91, 29},
		{ 46,	96, 32},	// Min: 5
		// ...remaining tuples...
The "Basalt" platforrm (Pebble Time / Time Steel) makes use of the PNG format's alpha transparency to allow each sprite to be rendered using the GCompOpSet compositing mode, so that the pixels are rendered just as they appear in the PNG sprite. For the "Aplite" platform (original Pebble / Pebble Steel), image resources are in 2-colour black & white, so transparency is achieved in a different way by changing the compositing mode.
For typical rendering code, you'll see the context set as follows:
#ifdef PBL_PLATFORM_BASALT
	graphics_context_set_compositing_mode(ctx, GCompOpSet);
#else
	graphics_context_set_compositing_mode(ctx, GCompOpOr);
#endif
In Aplite, the GCompOpOr compositing mode uses boolean algebra to set pixels white where they are white in the sprite. To clear the previous segment, the opposite approach is taken to set pixels black where they show as white in the spritesheet:
#ifdef PBL_PLATFORM_APLITE
	graphics_context_set_compositing_mode(ctx, GCompOpClear);
	// ...graphics calls to clear previously-drawn sprites...
	graphics_context_set_compositing_mode(ctx, GCompOpOr);
#endif
Rendering Only What Has Changed
Originally, I had developed this to update only the segments that needed changing, rather than the entire watchface. Early on, I found that I had to render the entire watchface on each tick of the seconds, as the underlying system cleared the layer that I was drawing the segments to. It bugged me that I had to do this, especially when I wanted the animation to run as smoothly and efficiently as possible. As it is, the CloudPebble emulator does encounter its limitations from running in the browser (which is an amazing achievement in itself), so any performance impact could easily be magnified. When it did come time to implement the animation, a post on the Pebble forums indicated a way to persist the state of previous frames each time the display is updated; this meant that I could update only the segments that needed changing as I originally planned.
What I was originally doing was rendering to a layer that was a child of the main window layer:
static void mainWindowLoad(Window *window)
{
	Layer *windowLayer = window_get_root_layer(window);

	// ...clipped lines...

	// Initialise watchface rendering on a child layer
	spriteLayer = layer_create(layer_get_bounds(windowLayer));
	layer_set_update_proc(spriteLayer, spriteLayerHandler);

	// Add child layers to the window's root layer
	layer_add_child(windowLayer, spriteLayer);
	layer_add_child(windowLayer, text_layer_get_layer(dayDisplay));
	layer_add_child(windowLayer, text_layer_get_layer(dateDisplay));
	displayUpdate();
}
Instead, this issue was resolved by rendering directly to the main window layer itself:
static void mainWindowLoad(Window *window)
{
	Layer *windowLayer = window_get_root_layer(window);

	// ...clipped lines...

	// Initialise watchface rendering on the window's root layer
	layer_set_update_proc(windowLayer, spriteLayerHandler);

	// Add child layers to the window's root layer
	layer_add_child(windowLayer, text_layer_get_layer(dayDisplay));
	layer_add_child(windowLayer, text_layer_get_layer(dateDisplay));
	displayUpdate();
}
The only caveat is that the call to window_set_background_color() no longer worked, since the default update function was substituted with my own implementation, so I had to blank the screen myself in spriteLayerHandler() by calling graphics_fill_rect().
Implementing Configuration
Adding configuration caused the project to increase in complexity. The initial working version included a date display in the centre of the watchface, inside the AM/PM segment. Unfortunately that proved to be too difficult to read due to low contrast, so I decided to move that to the bottom. This required the entire watchface to be shifted up slightly to make enough room to avoid interference when rendering either date updates or seconds as they tick by, as well as to balance the spacing visually. By default the date is configured to be hidden, in order to allow the watchface to be positioned perfectly in the centre of the display for symmetry. It was also anticipated that some people would choose to disable animations, possibly to avoid distraction or save a bit more battery life.
Hence the need for watchface configuration.
The configuration itself is performed on the smartphone paired with the Pebble smartwatch, and either uses a companion app developed for the corresponding mobile platform, or uses PebbleKit JS to load a hosted webpage containing the necessary form. I chose the latter, which allowed me to target both Android and iOS platforms at once.
Creating the form was just like normal web development, except for the JavaScript event handlers on the Save and Cancel buttons. Instead of posting back to the server, the event handlers set the browser's location to the appropriate return URL. For the CloudPebble emulator, this is the URL-decoded value of the "return_to" query string parameter; otherwise it is "pebblejs://close#" for the watch itself. In either case, any saved form data is packed as JSON and appended as a hash component. When the form is subsequently loaded, the existing data is extracted from the relevant query string parameter and used to set the initial state of the form controls and watchface preview.
This is all accomplished via jQuery as follows:
$(function () {
	var returnUrl = 'pebblejs://close#';
	var returnOverride = /\breturn_to=([^&]+)/gi.exec(window.location.search);
	if (returnOverride) {
		returnUrl = decodeURIComponent(returnOverride[1]);
	}

	// Watchface preview implementation truncated for brevity...

	$('button[type="submit"]').click(function (e) {
		e.preventDefault();
		var configuration = {
			isDateShown: $('#pbCfgIsDateShown').is(':checked'),
			isAnimated: $('#pbCfgIsAnimated').is(':checked')
		};
		location.href = '' + returnUrl + encodeURIComponent(JSON.stringify(configuration));
		return false;
	});
	$('button[type="reset"]').click(function (e) {
		location.href = '' + returnUrl;
		return false;
	});
});
The PebbleKit JS component is packaged as part of the watchface binary (PBW), and acts as the authoritative source of configuration data for the watchface. The typical workflow for configuring the watchface is as follows:
- Get the watch platform via Pebble.getActiveWatchInfo(); this allows the preview to resemble the watchface on the actual device.
- Package the existing configuration (loaded on startup) as JSON and append it to the URL for the config form.
- Call Pebble.openURL(configUrl) to launch the configuration form. In CloudPebble, this will automatically add the "return_to" query string parameter using proper syntax. Hash URLs do not work (speaking from experience).
- In the 'webviewclosed' event handler, URL-decode the configuration data from e.response.
- Use Pebble.sendAppMessage() to send the data to the Pebble watch.
- Store the configuration for next time via window.localStorage.setItem().
The watchface (in C), therefore, needs to register handlers to receive AppMessage data and update the display accordingly. Don't forget to call app_message_open() with a large enough 'inbox' size in bytes, in order to receive and acknowledge the messages sent by the PebbleKit JS component.
Animation
The Animation was relatively straightforward to set up. Basically, the animation instance is initialised and scheduled on each minute transition. Once the 'teardown' handler is called at the end of the animation (within the first second), this instance is destroyed. I ended up defining a custom implementation, which means that I could define the 'update' handler to maintain the state for each component (seconds, possibly minutes and hours). Animating a single property (as shown in the example) was not flexible for the animation I was trying to achieve. The initialisation is as follows:
static const AnimationImplementation animHandlers =
{
	.update = displayUpdateFromAnimation,
	.teardown = minuteAnimationCleanup
};

// 'minuteAnimation' is an Animation pointer (i.e. Animation*)
minuteAnimation = animation_create();

// Other initialisation settings...

animation_set_implementation(minuteAnimation, &animHandlers);
animation_schedule(minuteAnimation);
The 'update' handler was actually quite simple. All that does is some maths to scale the AnimationProgress value to the 'frame' value for seconds, minutes and hours, and stores the results for the display update procedure. Finally, a call to layer_mark_dirty() causes the display update to happen.
The most complexity came from updating the display based on the values set by the animation update handler and tick timer. This was because the same rendering code was used for both events. Some boolean algebra and use of truth tables was necessary to formulate the relevant logical conditions, so that the correct segments were drawn in the correct state. Other complexity came from the unpredictability of when animation updates would be exactly triggered in terms of frames - requiring added flexibility to blank the correct range of segments.
Preparing the Release
Testing & Debugging Tips
One handy improvement I added during testing was the ability to timeshift the watchface by a configurable number of minutes. This became a very helpful time-saver in debugging animations (alongside liberal use of the APP_LOG() macro), especially when I wanted to check and recheck transitions from 11:59:59pm to midnight. It also helped in generating screenshots for the Pebble App Store, so that I could set any desired time and date and maintain consistency between the Aplite and Basalt screenshots. To enable this, all I had to do was set a boolean flag in PebbleKit JS to 'true' and recompile. As a result, launching the configuration page would result in an extra field being shown to set the minute offset.
Another handy tip was to surround verbose logging calls (in C) by #ifdef preprocessor directives, then optionally #define the directive in the header file (or comment it out for release builds). This made it easy to switch debugging on or off; I didn't have much success being able to view more verbose logging levels in CloudPebble, so I stuck with APP_LOG_LEVEL_DEBUG. Not every logging call worked in the CloudPebble emulator - I had more success logging every animation frame on the Aplite emulator than the Basalt.
Publishing on the Dev Portal
Publishing is done at dev-portal.getpebble.com. Like similar markets, this requires an upload of the binary package, as well as the assets - which are defined for each supported platform (under "Manager Asset Collections"). The binary package is the PBW file, which can be downloaded from CloudPebble via the Compilation tab. Since Hex-An was built for both Aplite and Basalt platforms, each platform required their own version of the following:
- A description (max. 1600 chars);
- 1 to 5 screenshots, at 144x168px in PNG or GIF format (including animated GIF);
- A marketing banner (optional), at 720x320px in PNG format.
Once this was done, the watchface was ready to be published via clicking the big orange "Make Public" button. If there is a later need to publish updated versions, remember to increase the Version Label in the Project Settings tab of CloudPebble first, otherwise you'll get a vague error that the package is invalid.
Hex-An is Live!
You can view the web-accessible page on the Pebble App Store at apps.getpebble.com, though the watchface directory cannot be browsed like on the Pebble mobile app. For a bit more background info, check out the dedicated page here. It's also accessible via the new Pebble section, accessible from the top of the page.
Hex-An v1.1 screenshots for both Pebble platforms. Times from L-R are 10:30:10 AM and 4:29:36 PM.
If you have any Pebble smartwatch, feel free to download Hex-An and enjoy!